I was 9 when the first Galaxy explorer came out. Building the LEGO 10497 galaxy explorer took me right back to that first experience. It’s for this reason, and many others that I am crowing this set the best LEGO set of 2022.
Over the past few weeks as the year wound to a close there were lots of polls about which LEGO set were the best: Lion Knights’ Castle, Transformer Optimus Prime, the Mighty Mario Bowser, or even the Boutique Hotel Modular. I’ve built all of these, and none compare to the LEGO Icons Galaxy Explorer of 2022.
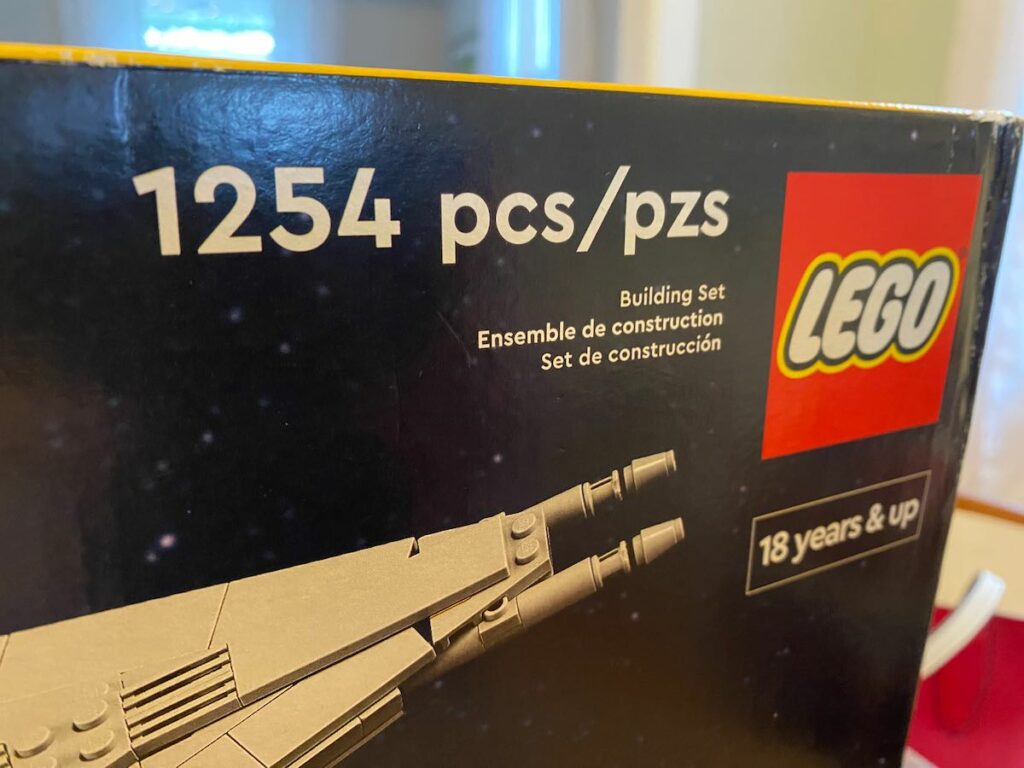
- MSRP: $99.99
- Set Number: 10497
- Recommended Age: 18+
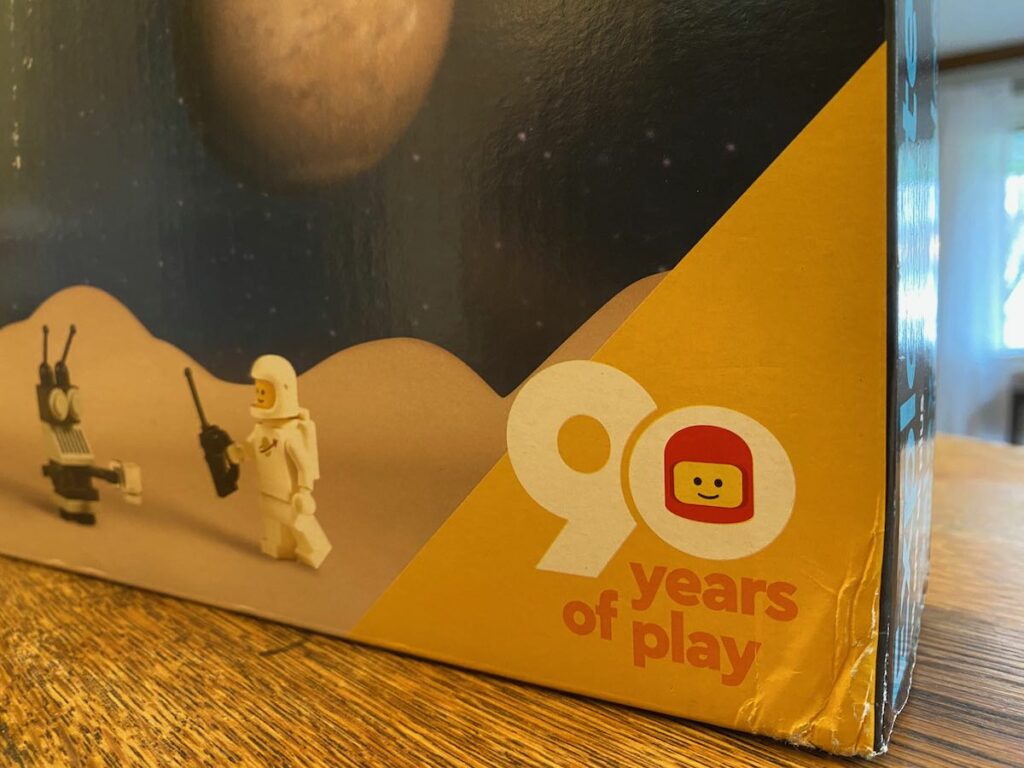
- Release Date: August 1, 2022
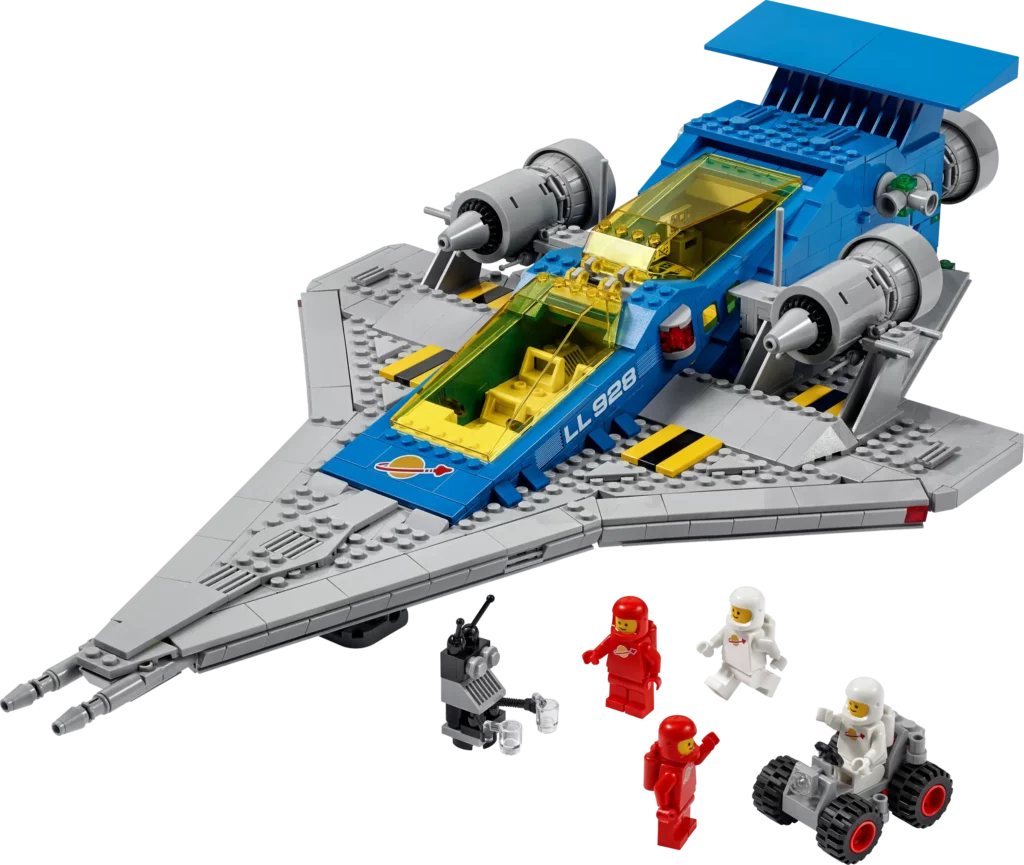
- Part count: 1254
- Number of Minifigures: 4
Now that I have your attention, let me go over the box opening, build, and review.
But before I do, I should share that I didn’t get this set through one of my usual channels.
Regular readers know that I live quite a way away from my nearest LEGO store. So I usually either order directly from LEGO, or visit Target or Amazon to pick up my sets.
One place I never go to is Walmart. I won’t get into the reasons, but it has been many years since I set foot inside one.
Normally this set retails for $99.99 – which is an amazing deal to begin with.
Walmart sells it for $75.00 both on-line and in person.
But, several times in the late summer and early fall of 2022, it was on sale for $50. Yep. Just $50. So I bought it. How could I not for such a premium LEG0 buildable model?
I only wish I had purchased 5 more at that price.
If you are looking for other LEGO websites that can help you find good deals or building techniques – Be sure to visit these 13 other LEGO websites.
The Most Nostalgic Building Project
I remember very clearly when the classic space Galaxy explorer came out. It was set 497 and had 338 pieces (which was a LOT for a 10 year old kid at the time).
My friend Jon (he was a huge space enthusiasts) got the set before I did. I remember going to his house and seeing all his classic space sets displayed on a built in book-case in his bedroom.
Every few days, I’d ride my bike to our small town toy store. It was called Toys Galore and had a great selection of LEGO sets for the time.
I’d walk down the red and white checkerboard floor tile and pick up the set, studying every inch of it, dreaming that someday I would have it. But it cost like $30, which was more money in the world to me, a 10 year old in 1980.
Then the holidays came around, and the December of that year I found myself in possession of it!
The box opened differently from LEGO sets of today. The whole front panel lifted up like a door on a hinge, and inside was a plastic insert with several circles full of bricks, a couple of grey space base plates and instructions- plus more photos on the inside.
I wish I could say that I remember the build process for that vintage set but it was just too long ago.
However I do remember playing with it. How the back opened up and the little grey space car could roll out. I remember the red and yellow trans clear pieces. And of course the red and white space minifigures.
I probably kept it as complete as I could for as long as I could – but 10 year old boys aren’t always gentle with their toys. Over time the pieces got separated and put into the big red bin with the rest of our LEGOs (yes we called them that back then).
But I do remember swooshing it ~ and Pew-Pewing the lasers. Great memories.
Sadly, I no longer have this set. It ended up going into this big red plastic storage cube (which had all our other pieces, and after many years of storage, went to my brother, who even though he was younger, had kids before I did. I do still have one of the white space men.
Over the years this blue, yellow and grey ship has influenced the direction of the company. From the original space theme that had over 360 sets and lasted from 1978 to 2013, to the inspired SpaceShip Benny made in the LEGO movie.
This ship started it all.
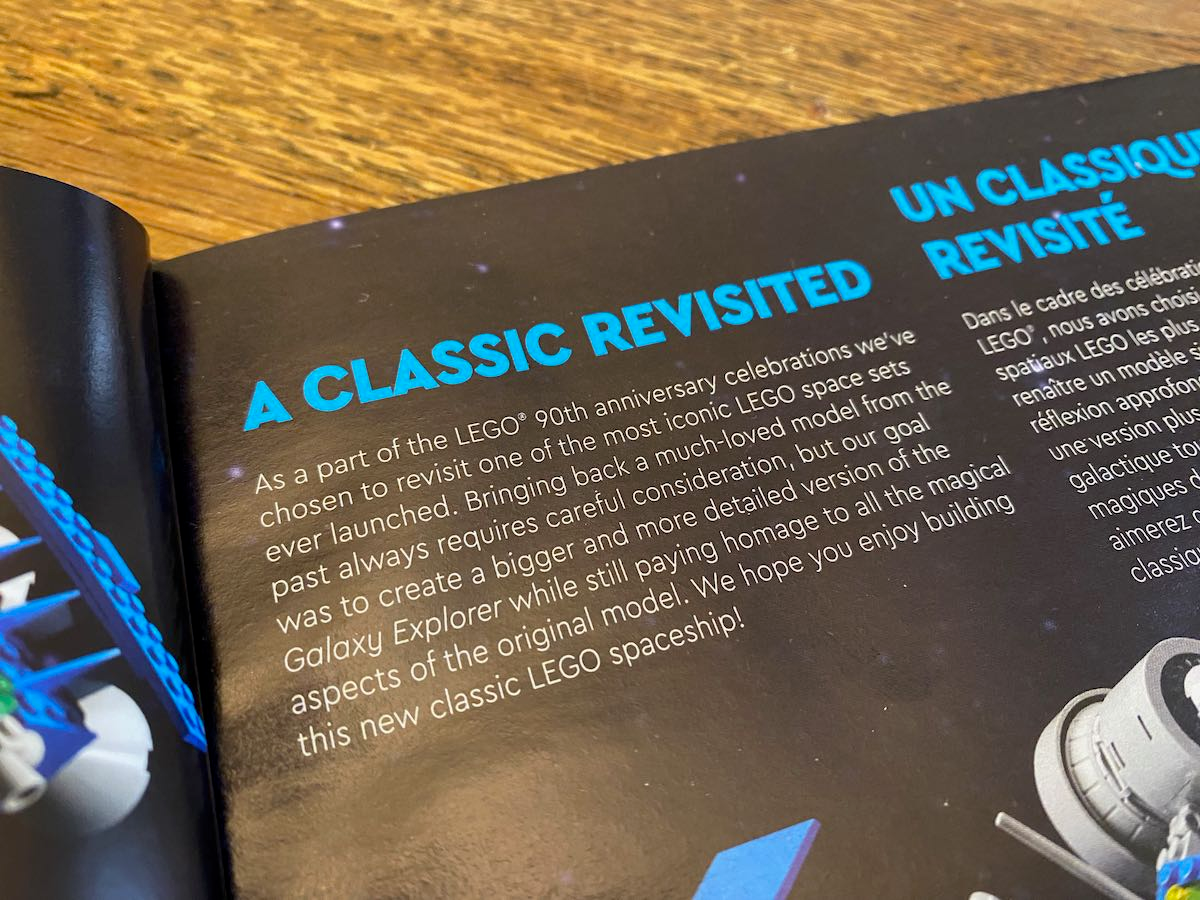
A Classic Space Building Experience
The LEGO group, and specifically Mike Psiaki the designer (LEGO Carousel, Downtown Diner, Ferrari F-40, a bunch of 3:1 sets and so much more) and has done a great job bringing back the feel of the original Galaxy Explorer with a modern twist for today’s builders for the company’s 90th anniversary collectible edition.
He began by actually limiting himself to use only the classic color scheme that were found in the first Galaxy explorer set.
Then he used more modern building parts (like a Technic frame) and techniques (like angled wings and fuselage) to create an updated version.
Plus, if you use the LEGO Builder App, you can see 2 more alternate builds for this model – but more on that below.
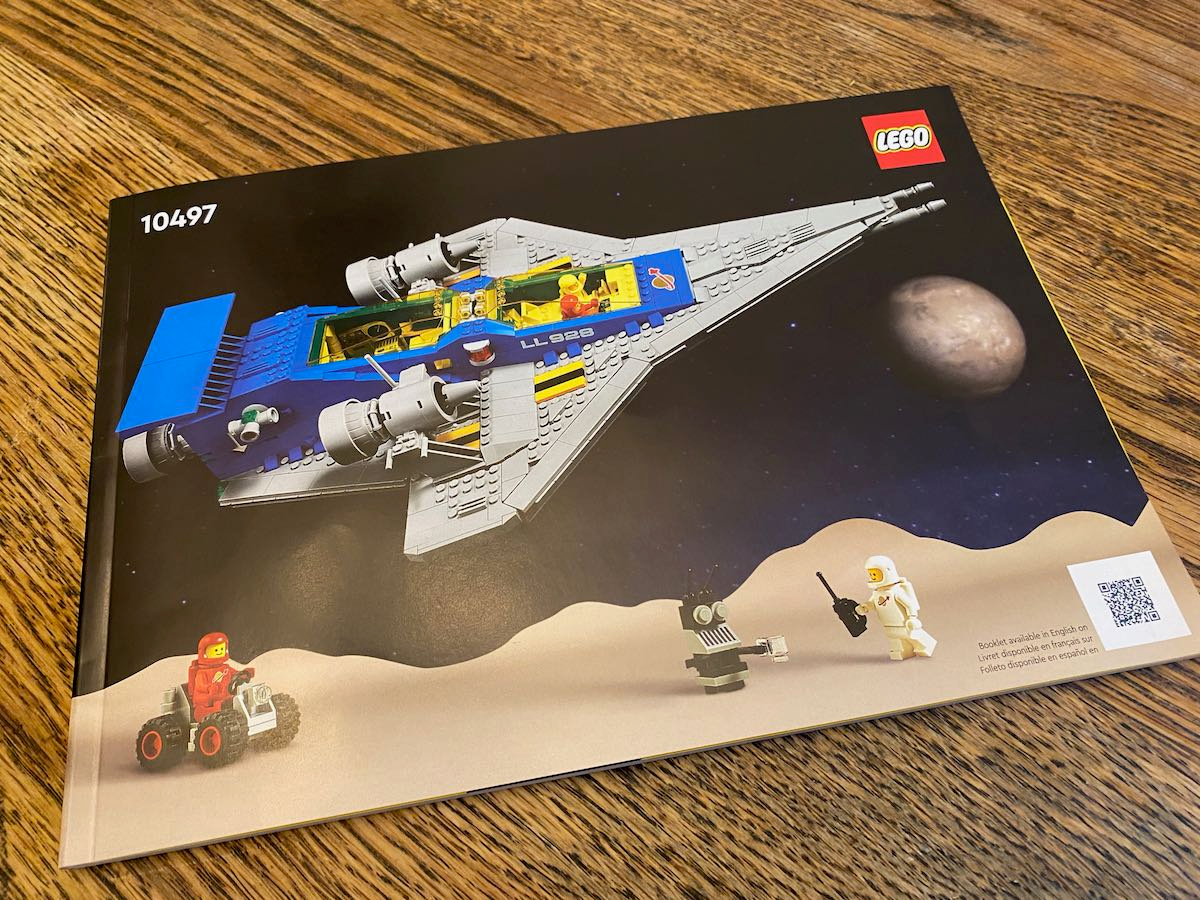
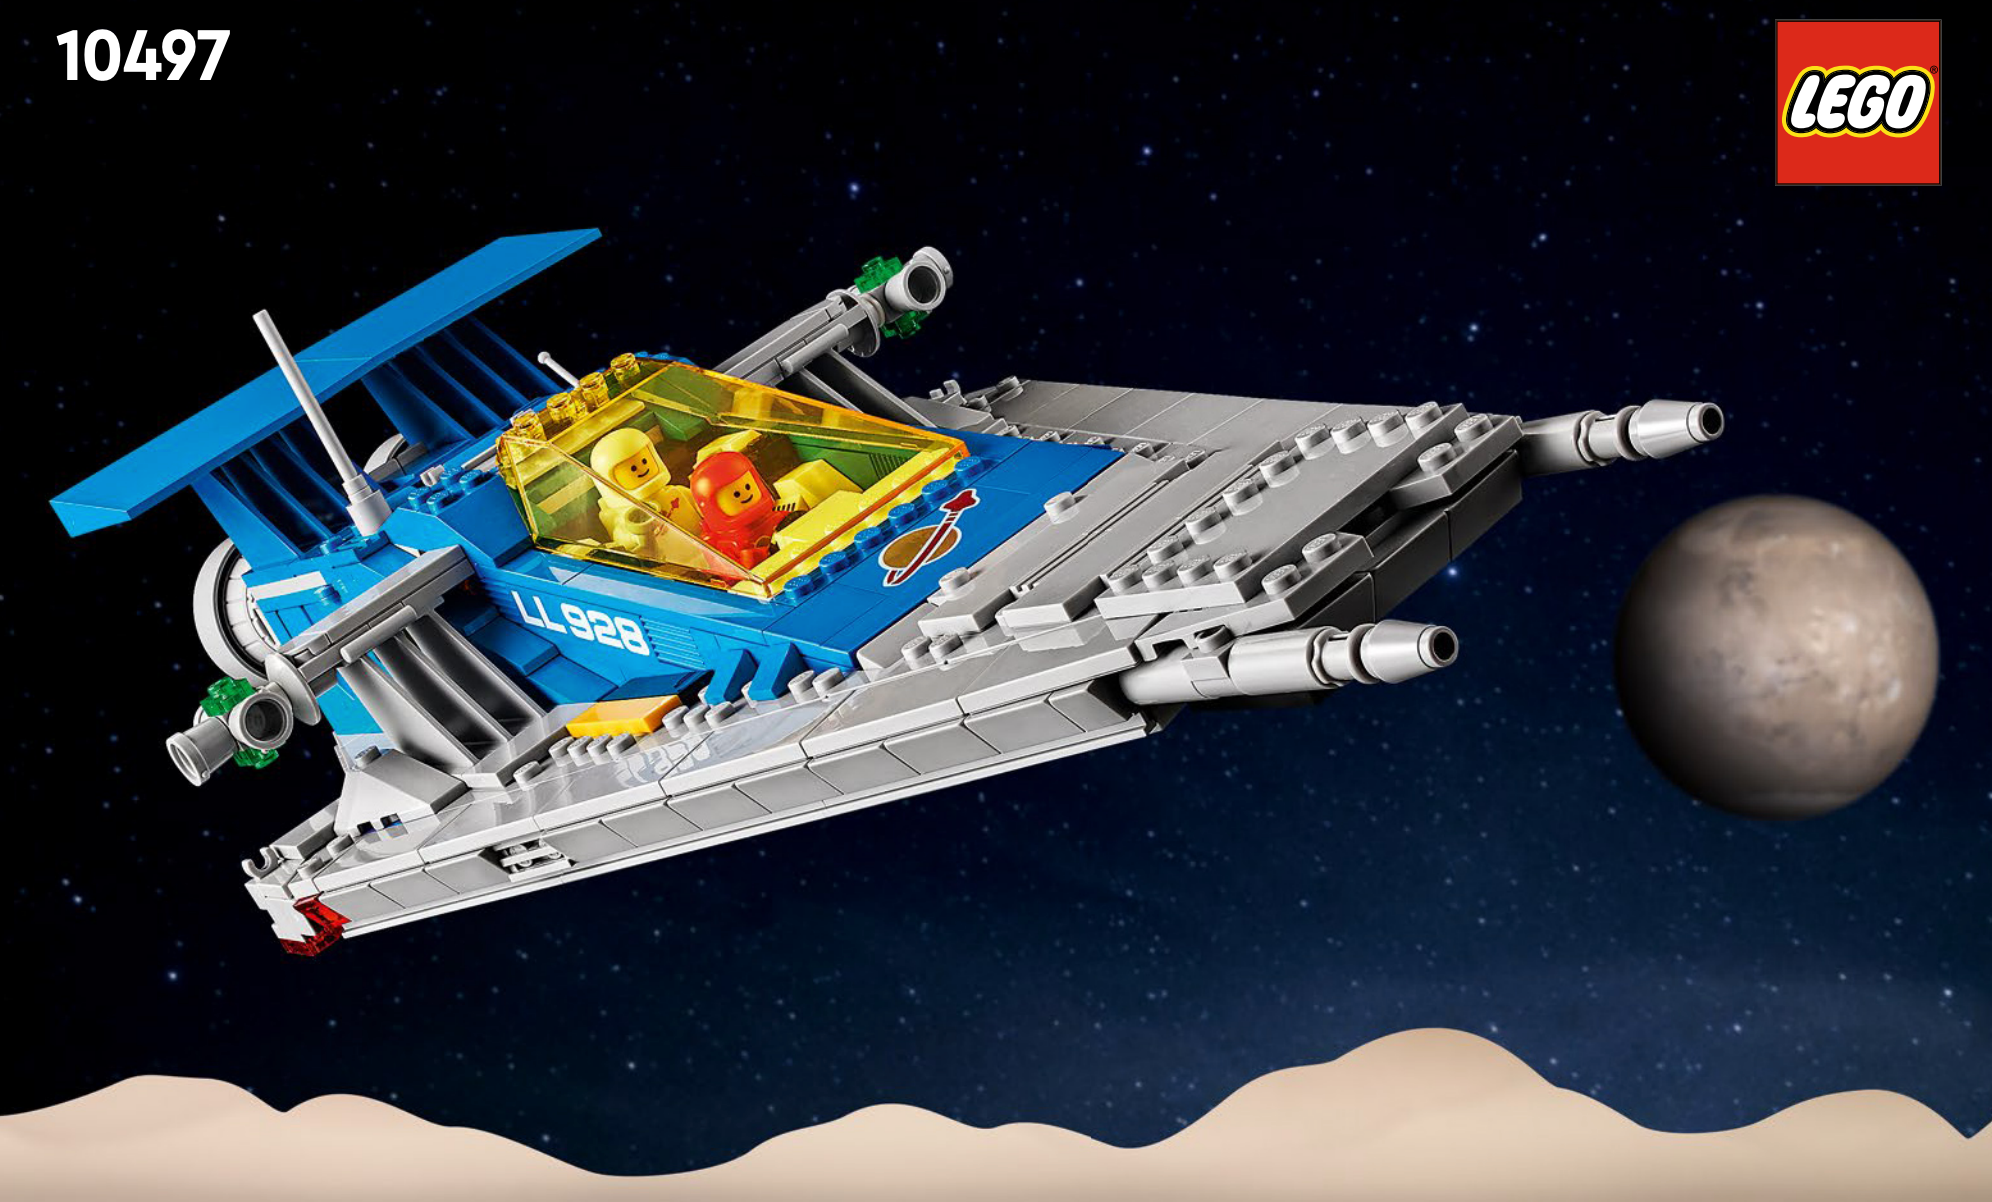
Inside the Galaxy Explorer 10497 Box
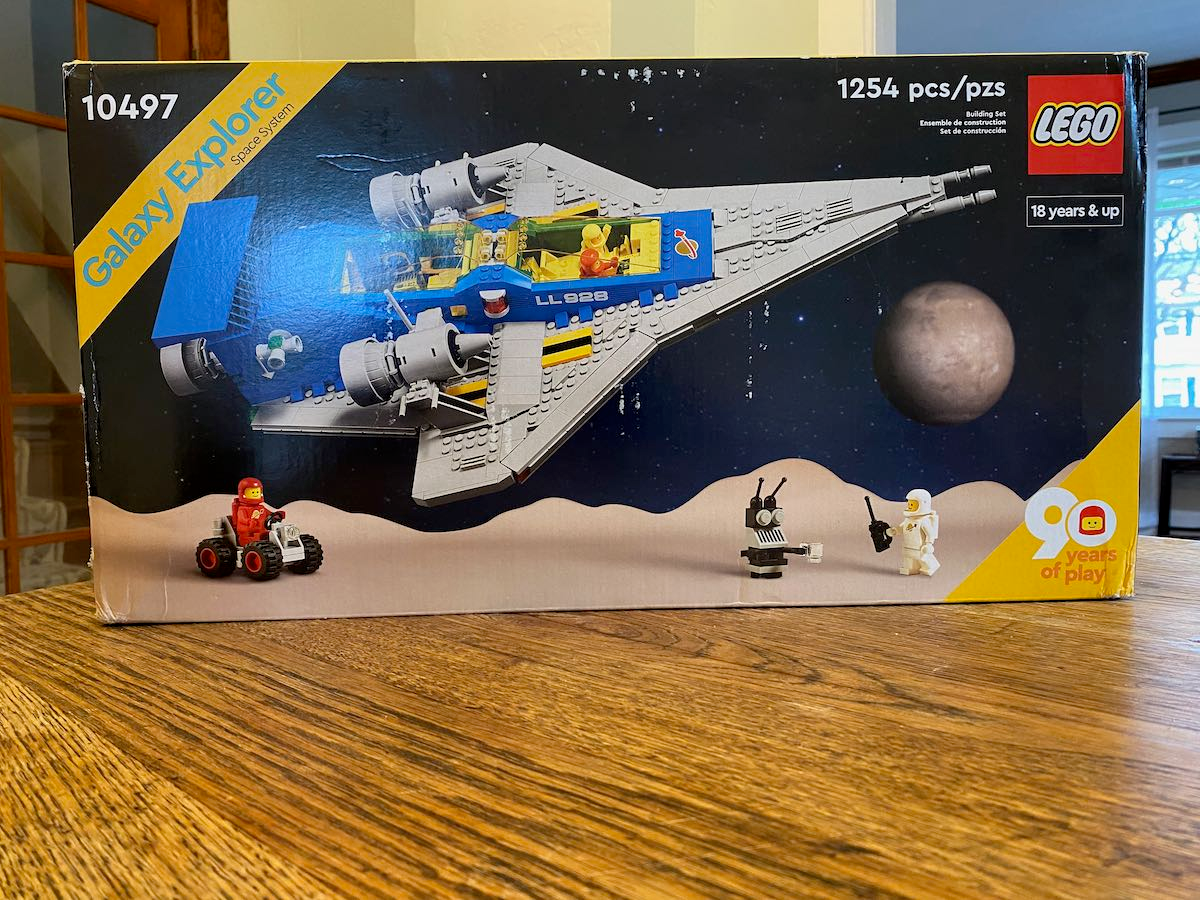
The retro building techniques start with the box. With the new galaxy explorer, the box shares many similar details. The size is comparable (even though the piece count is nearly 4x the original galaxy explorer. The picture of the model has the same angle and lighting.
Even the graphics mimic the first Galaxy explorer. The set number and LEGO Logo are in the top right corner, and the sides of the box share the same yellow background and teal font color.
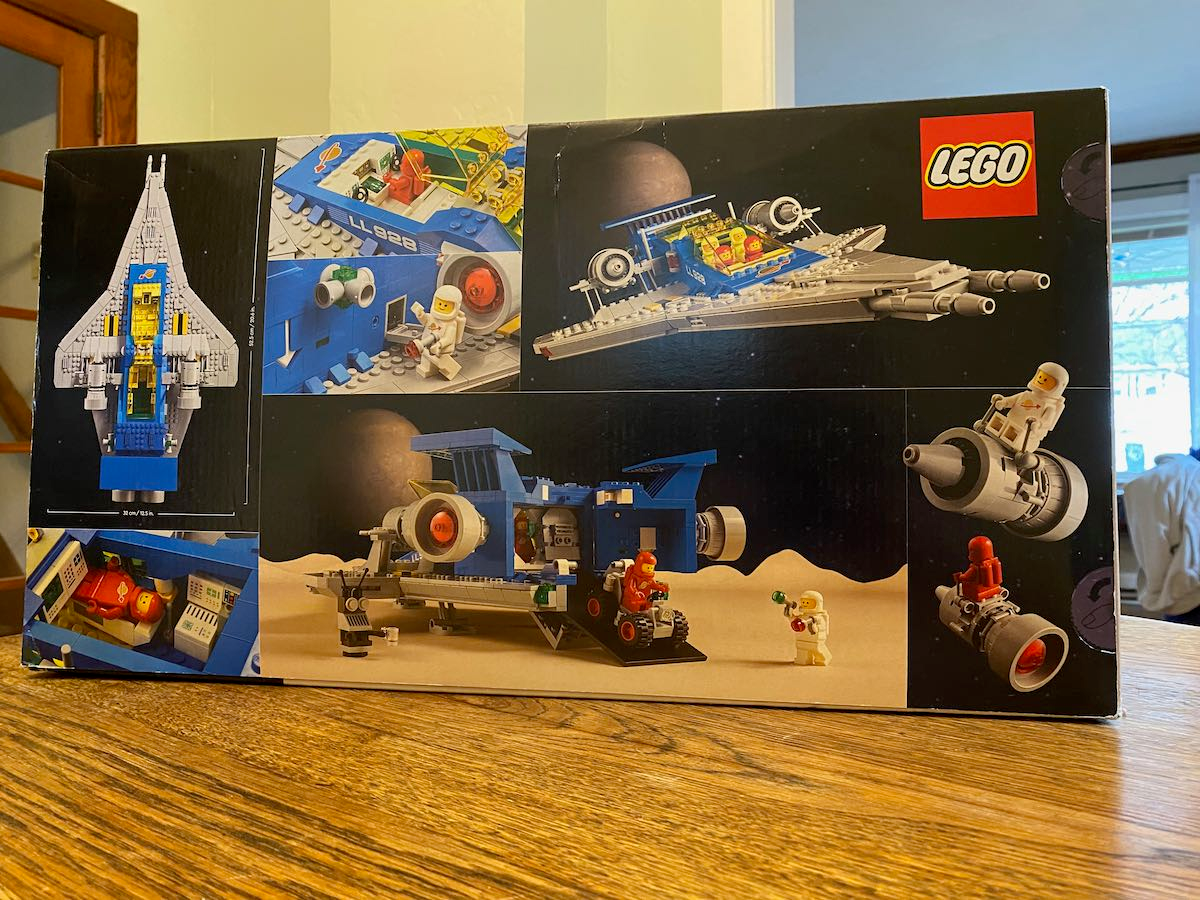
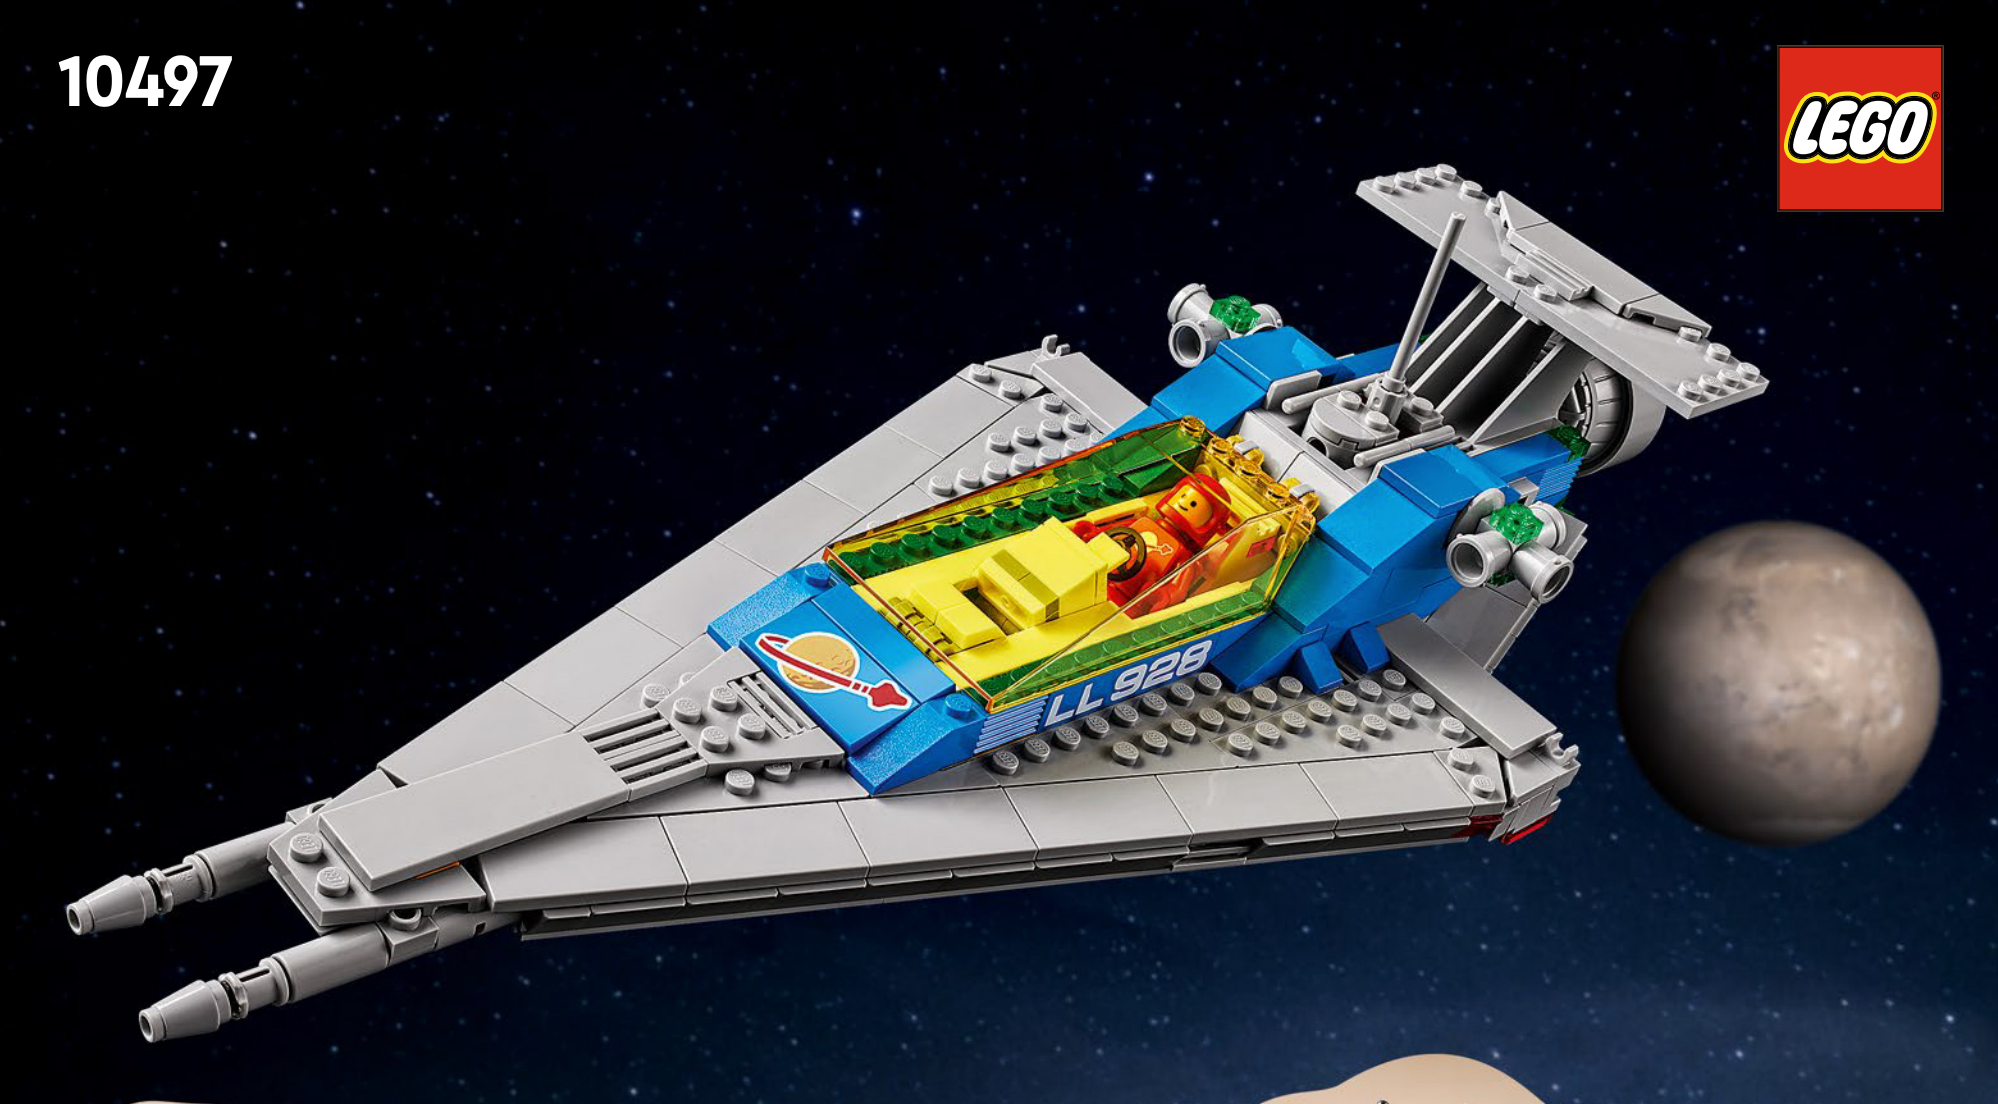
On the Back of the box are several other angles of the ship, as well as some of the play features. I especially love how the main wing thrusters can be removed and have a palace for a minifigure to sit and control the most powerful shuttle ever.
What comes in the Box?
There is a major difference about the inside of the boxes.
The old galaxy explorer had a plastic insert with 3 circular sections to hold the parts. Plus there was a large 64×64 grey baseplate included with a landing pad (that the new one doesn’t have).
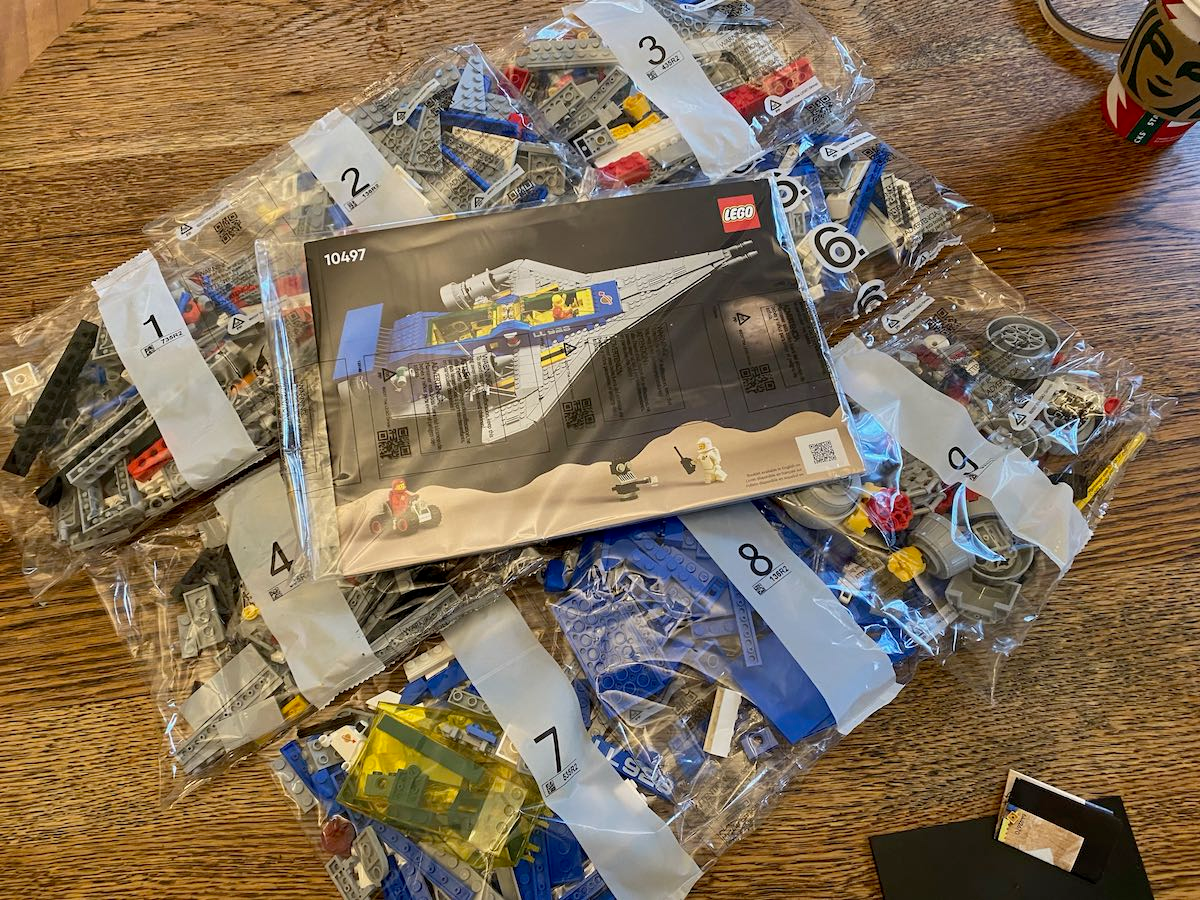
Inside the Galaxy explorer box are the usual things you would find in a LEGO set. There are 9 plastic bags, an instruction book wrapped in plastic, a large black tile plate, and I also got a folded up leaflet with other sets.
I was EXTREMELY happy to see NO stickers included with the Galaxy explorer. It would be a shame if LEGO added stickers to this iconic set. Printed tiles only, thank you!
But – I am also anxiously awaiting the change from plastic bags to a more eco-friendly and sustainable material. LEGO has announced that they are slowly changing their packaging to a a paper based product, and if you ask me they can’t do that soon enough.
They have pledged to have fully converted by 2025 which is just a few short years away.
Add gallery of bags and stuff in the box.
The Galaxy Explorer 10497 Instructions
The instruction book for the LEGO ICONS galaxy explorer is packed with information. Not only are there instructions for the classic buildable model, but there is a great history of the set and space theme, as well as a hidden easter egg.
Let’s start with the Easter egg.
LEGO QR Instruction Code

Located in the bottom right corner of the instruction book is a QR code for the Galaxy Explorer. I’ve included a high res picture above so you can actually use it.
Simply open your camera on your phone or tablet, and scan the code.
That will link you to the LEGO Builder App which has a digital version of the instructions, as well as TWO Alternate builds!
I have a strong feeling that LEGO will be pushing the Builder app more and more as they transition to more sustainable materials. Plus they can include so much more digitally. AND it aligns well with their new Build it Together initiative so multiple people can build simultaneously. The Galaxy explorer 10497set doesn’t really lend itself to multiple people building, but thats OK by me. I wanted to do it all by myself.
If don’t have a mobile device, you can still access a digital version of the instructions on the LEGO website. Here’s a link that also includes the alternate builds.

Additional details in the printed instruction book are a nice section from Kjeld Kirk who is the grandson of the founder of LEGO – Oleg Kirk. He was the guy in charge when the original space series launched.
Perfect Use of the Classic Space Logo
There are also a few pages about the history of the ship. I don’t usually read this sort of stuff, but found it very interesting this time.
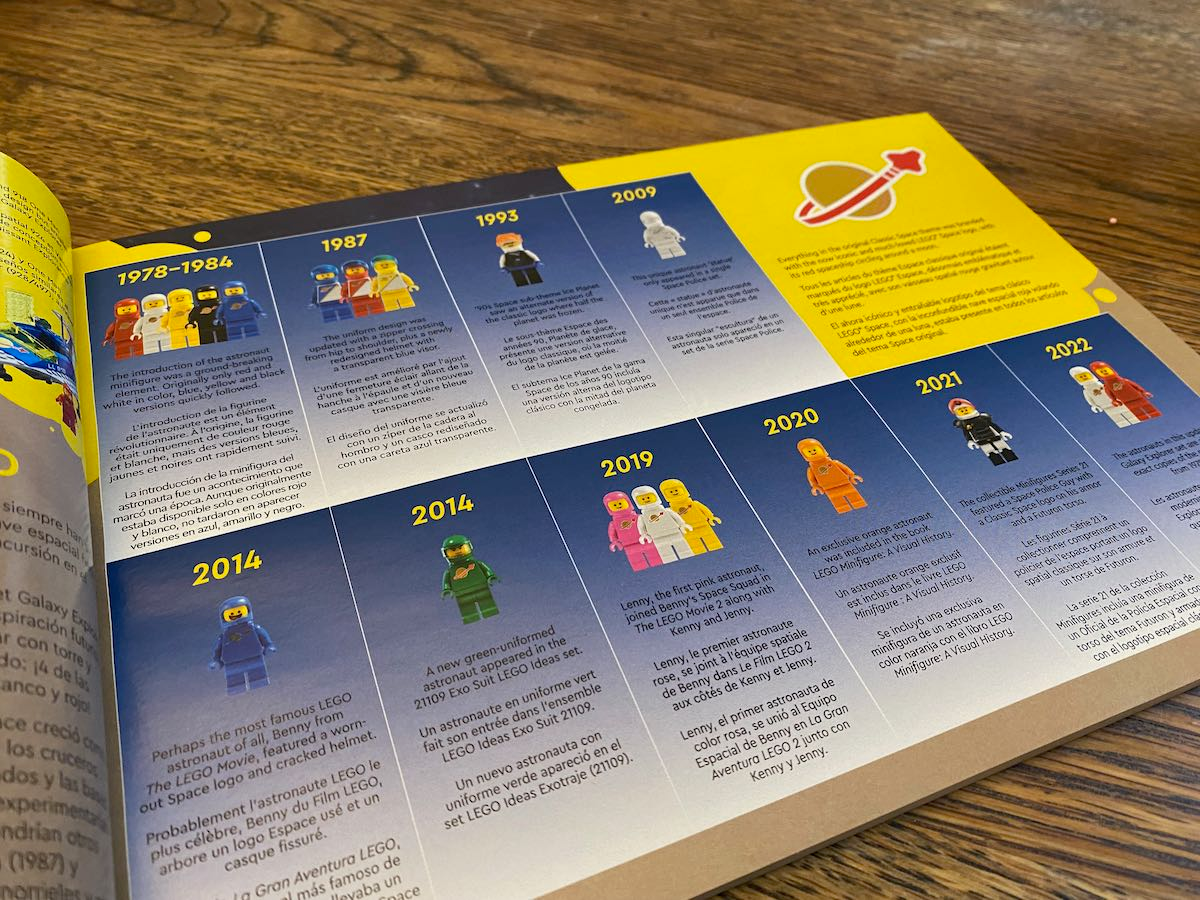
I especially liked the history of the LEGO spacemen throughout the years. They included all the ones released at the time of set release. But since then a new brown LEGO spaceman has been released in CMF series 24.
Don’t forget to read more about the designer. Plus there is a whole page devoted to our favorite LEGO tool, the Orange Brick seperator!
Building the 10497 Galaxy Explorer
Well, you’ve read a lot to get to this point. So let’s jump in to the bag-by-bag buildable model.
The first 4 bags are dedicated to building the frame and lower level of the classic space ship, plus two minifigs and the robot helper. Bags 5-9 complete the model with the upper section and details including the remaining 2 minifigs and the little space car.
Opening Bag 1
Bag 1 starts by building one of the red astronauts and the brick built robot helper.
There are a multitude of technic bricks and pins that get assembled into the basic center part of the frame.
About half way through the bag the retractable ramp is built.
The bag finishes with the construction of the rear retractable landing gear. A nice addition from the previous older set.
Opening Bag 2
With the second bag, light bluish grey triangular plates are used to form the rough shape of the wings on the bottom of the model.
Other red and white bricks are used to fill in some gaps and provide more attachment points for additional plates and subsequent structures.
Some cockpit details emerge, too! Another way the designer honored the original set was by using steering wheels as controls for the ship. While the first one had just a single steering wheel, the new galaxy explorer has 2. One for the pilot, and a 2nd for the co-pilot.
Some additional details are added to the section where the rear doors are, and then a sub assembly is created that defines the sides of the cockpit.
Be careful assembling these sides. There is a left and a right that are the same, but the mounting point can be tricky. I made a mistake at this stage that was not easy to correct when I discovered what I had done.
Opening Bag 3
A white Astronaut is the first thing built in the 3rd bag.
Did you know that the different color suits mean something
According to the creator of the Classic space theme and mini-figures, Jens Nygaard Knudsen:
the Red astronauts were supposed to represent PILOTS, the White astronauts were supposed to represent EXPLORERS, the Yellow astronauts were supposed to represent SCIENTISTS, the Blue astronauts were supposed to represent SECURITY and the Black astronauts were supposed to represent SPIES
Then a few more sub-assemblies are built that help define the wings. There are left and right sides, so pay attention to the orientation again.
Some longer rear parts are put together to define the back of the ship, and some hinges are used to create the perfect angles.
At the very rear are two pieces that were super rare back in the day. Trans Green!
Finishing the bag are some larger grey cheese wedges that finish the edges of the back of the wings.
Opening Bag 4
A few more sub assemblies are created with the start of the fourth bag. These help define the delta wing configuration. Tiles and more cheese wedges create the smooth edges on the sides of the wings.
There is a note about the navigational lights too:
The red and green navigational lights on the original model were not placed traditionally, (red lights on the left side, green lights on the right). Instead, the red lights are towards the front and green towards the rear. This new model keeps that same placement.
On step 118, I learned a new building technique. Using a Modified 1 x 1 with Light Attachment combined with a Black Bar 1L with 1 x 1 Round Plate with Hollow Stud an adjustable angle attachment point is created to maintain the orientation of the delta wing configuration.
Opening Bag 5
Now that the basic shape of the ship is taking shape we continue with the upper half.
Although it has been fun to build up to now, we begin a lot more details and interior compartments which takes it up a notch.
Another Red Spaceman is built and then the front nose elements are constructed next with this bag.
Details on the Nose are added and the top plates are added to the wings to hide the internal technic bits.
At step 142 the iconic yellow and black stripes are added to the wings with 1×4 tiles. More details are added until the bag is finished.
Opening Bag 6
The LEGO galaxy explorer is now really taking shape. With bag 6 the large black tile is used to make the retractible ramp at the rear doors. It isn’t connected to anything which allows it to slide in and out of place as a cool play feature.
Blue plates and bricks are added to build up the sides of the fuselage, and sloped bricks help complete the look.
Two white beds are built with a little cut out for the astronauts to be able to lay down with their air/jet packs in situ.
A clever use of technic pins is used at the rear doors to hold the rover in place when the ramp is up, but stays out of the way when the ramp is down allowing the car to roll out.
Some mailbox compartments are added near the wings allowing the explorers to access additional equipment when they are outside the ship in these storage compartments.
Finally the mounting points are constructed for the engines that reside on the wings.
Opening Bag 7
The final astronaut is made, as we begin to approach the completion of the build.
More blue tiles are added, as well as dome computers and displays on printed bricks and tiles. These display pieces were very cool in the original craft, and I’m glad they are still used in a more modern form.
Perfect Use of the Classic Space Logo
Two 1×6 Blue bricks with the classic LL928 written in white block letters are added (that was the original Galaxy explorer set number btw), and a 2×4 blue tile with the classic space logo printed is goes at the front.
More computers and display pieces are added to the rear section. This set just gets more and more fun to build!
Windows and more details are added and a clever rear sliding hatch is constructed using a little utilized technique for sliding doors. This creates a little air-lock between the rover compartment and the living quarters.
A very unique method is used for attaching the yellow canopies. It’s hard to explain, but it uses clips and snot techniques like I’ve never seen before. And with the addition of the canopies the second to last bag is finished.
Opening Bag 8
Now for my absolutely favorite part of the build. I’m so glad they saved this for the end – it makes for a great finish.
On the back doors (the ones that open) are two white arrows. In the original they were printed tiles, but now they are brick built using white shield pieces and Blue Panel 1 x 2 x 1 with Rounded Corners.
Side jet engines are built and then we move to the rear wing.
Finishing with Bag 9
This last bag has the big engines being built. First are the rear ones, then the ones that go over the wings.
The very last step is construction of the rover.
After more than 232 steps the Galaxy Explorer is complete!
10497 Galaxy Explorer Alternate Builds
Two different alternate builds are included (using the Build app). These use the same pieces included in the set, but only one ship can be built at a time. To build all 3 ships, you would need 3 complete sets.
The first is a 2 person ship that is triangular in shape.
The other is a single person ship that looks very fast!
From beginner to advanced, another very common question I get is how to make your own LEGO instructions – I’ve got a step by step guide just for you!
My regular readers will also know that I am a huge fan of the LEGO Modular buildings – have you seen it?
Final Thoughts on the Galaxy Explorer
This set brought me all the joy I remembered from when I built the set as a boy. It truly is a great nostalgic building project and the spaceship retains many original designs like the blended delta wing configuration. The new Galaxy Explorer is great for both space enthusiasts as well as “regular people”, and makes for a great set for anyone who loves LEGO. It’s an immersive project that took about 3-4 hours to build.
Do you link LEGO will ever resurrect the Classic Space theme? Do you have LEGO Icons Galaxy Explorer set? I’d love to hear your thoughts below.